Sunday, June 26, 2011

Red Wine Syrup


I will freely admit that I am a box wine drinker. There. I said it. It's not just all Almaden, my friends. You know that, right? I'm talking decent boxed wine. It's not stunning, but I just pretend I'm at an art opening. I like to have it around when I want just one glass of wine. I like that it lasts for a while. And it's always there when I need to cook. As they say, you should always cook with wine you would drink. By the end of the winter, though, I had a box left that had been sitting around a tad too long. I couldn't bear the thought of drinking it any longer (the down side of a box that holds five bottles of wine!). So I had a plan. First off I froze some in my teeny tiny ice mold. Aren't they cute?

There's nothing for scale, but they are like the size of a boullion cube.
Then I had a fabulous idea, or so I thought. Red wine syrup. Oh, goody! It was simple, just took lots of boiling down. And let me tell you, this stuff is incredible. Puckery and tannic still, but full and rich and ripe as a grape. I'm seeing this in a salad with some salty charcuterie on the side, drizzled over cheese, or on a steak. Or how about something that's so versatile that it can also sit on top of some buttermilk ice cream? Wow. Or, of course, added to a pan sauce or a dressing or a jam. I'm just getting started here...

Red Wine Syrup

8 cups of decent wine (mine was a medium-bodied Italian blend, not too fruity)

Put the wine in a good stock pot and boil it down in half. Then add:

2 cups of sugar

Return the wine and sugar to a boil. Keep it at a fast and furious boil until it looks syrupy and good to you. For me, this was 222 degrees on a candy thermometer. It was glossy and coated the spoon. See picture below.

Pour your syrup into jars. Yield is three half-pints. I didn't process this, but sealed the jars and put it in a dark, cool place: my basement cupboard. As it's just wine and sugar, I felt okay about this. But if you don't, just put it in the fridge. I'm sure it'll last up to a year in there.

You can drag your finger through it and the trail stays put.

Thursday, June 23, 2011

Quick Fruit-Filled Coffee Cake


Blueberry coffee cake? Who turns that down?

I think I mentioned my stem to blossom-end philosophy last year during Tigress' Can Jam. I love using up everything I can, and that means that when I make juice or jelly or do something that leaves me with fruit pulp I invariably find a way to use it. This cake was born of that compulsion. It's incredibly quick and easy, and not too sweet; a great every day cake. One that you can leave out for a few days--it stays moist and if heated up for just a few minutes and you have a tasty treat.

I used rhubarb pulp from making rhubarb juice for the cake pictured below. It's color is a tad dull, but tasted great. The blueberry was leftover from syrup making. I really couldn't leave that goodness to waste. Spread over a thick batter and covered up with crunchy crumbles, and no one's the wiser. Saved from the compost!

Combine:

1 1/2 c. AP flour
1/2 cup of sugar
1 teaspoon of baking powder
1 teaspoon of baking soda
1/4 teaspoon of salt

Mix in a separate bowl:

1 cup of buttermilk
2 large eggs

Add the dry to the wet until just smooth. Don't over mix. Pour into a greased 10-inch spring form pan, and smooth the top. Spread about two cups (give or take) of fruit pulp over the batter. Cover with streusel topping. Bake at 350 degrees for about 45 minutes.

Streusel topping:

4 tablespoons of butter (oil works too)
1/4 cup of slivered almonds
1/2 cup of whole rolled oats
1/2 cup of sugar

Note: I do not sweeten the fruit, but you may want to depending on your tastes or the tartness of your fruit. The blueberries didn't need any extra sweetener, but for the rhubarb I sprinkled sugar on the layer of fruit before adding the streusel.

I love that this recipe only uses a few ingredients. If you don't have buttermilk, go ahead and use yogurt!

If you want to step it up and get fancy, head on over to these two amazing takes on a recipe for Rhubarb Kuchen:

Cakewalk: Rhubarb Kuchen
Tigress in a Jam: Rhubarb Krack


Dull, but tasty, rhubarb.

Wednesday, June 22, 2011

Hip Girls Guide To Homemaking - Winning!

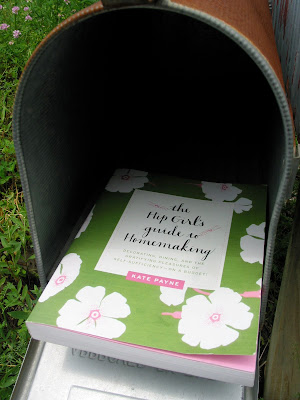
You've got Hip Girl's Guide to Homemaking Mail!

There were almost one hundred comments vying to win Kate Payne's Hip Girl's Guide to Homemaking: Decorating, Dining and the Gratifying Pleasures of Self-Sufficiency--on a Budget! on my giveaway and review post. A lot of folks left a comment even if they had the book, which, to me, says a lot. I was really impressed at how many people wanted to tackle cleaning projects with a greener outlook. Or to just be better at cleaning. That made me so happy! I feel the exact same way. But mostly, what I loved about the comments is that it showed that people are always striving to be better, live better. Isn't that a beautiful thing?

Lately, I am so excited to get better at my life. When I look at my garden I think: in ten years this is going to be amazing! Looking back to the last six years, since moving into my home, I can see how far I've come. I can't help but to be excited about the next ten! Or cooking: in a few years, if I keep up at this clip, I'll be so much better. There's so many things to learn! Sometimes my hummus or jam or pie crust comes out perfectly. Other times, well, there are those other times aren't there? And for that, there's help. And hope! And a little luck. And without further ado, here are those lucky winners!

First Prize goes to Millie's Mama of Millie's Bookshelf. That's a copy of the book, and a jar of preserves from Ms. Kate Payne herself!

Second Prize goes to Gabrielle of Pittipanna. That would be a jar of jam from lil' ol' me. See, it never hurts to be the last one commenting!

Congrats, ladies. Thanks to everyone who left a comment. Keep on getting better! And if you want another chance to win this inspiring book, head on over to Hitchhiking to Heaven, where there's another giveaway going on. Last day is June 26th!

Wednesday, June 15, 2011

Sweet, Sweet Italian Sausage


Welcome to the half-year mark of Charcutepalooza! This month's challenge was stuffing sausages. And I'll tell you, that is a beautiful thing. I sort of feel like this might be my worst Charcutepalooza post, as my mind is a million other places right now, but by far it was the most fun. Indeed, I had so much fun, and enjoyed my sausages so much, that I neglected to take any really wonderful photographs, except for that one above. I had the great good fortune to work alongside Winnie from Healthy Green Kitchen, and Peter from Cookblog. Both Winnie and Peter are people I not only admire greatly for their intelligence, expertise, sense of aesthetic and wicked humor, but they are also just really great people. I was really surprised at how comfortable it was to get together with a few folks, stand around a KitchenAid with a grinder attachment and fill hog casings with ground meat. 

Can I tell you also about how easy it was to fill the sausages? But really, it's one of those things that you need to do, to feel, to understand. We brought our already ground sausage, chilled and ready to go. Peter, who is the pro in this case, kept the hopper filled, and Winnie and I experienced the filling of the casings. I was a little worried about twisting them off, but ends up you don't have to. Fill your sausages and then twist them after, when they are inert and laying on the counter. Like animal balloons. It's actually a lot of fun. 

Here's my sausage story: when I was a kid I would help my father make sausages. It was not uncommon in my house to find a small plastic container of hog casings packed in salt in the door of the fridge. We had a little electric grinder, and watching the meat push through the cutting plate was better than any plastic Play Doh toy. I've been telling my Dad about my adventures in sausages, and this makes him very pleased. (Happy Father's Day, Dad!)

My learning curve: left, a squiggly beginning, right is the stout end.
My sausage was a very basic Italian, pretty much from the book, Charcuterie. I omitted (forgot?) the black pepper, and used a lemon thyme pickle brine instead of the red wine vinegar. Because our plans to meet came together rapidly, I didn't really have time to think about it. I had 2.5 pounds of pork, cubed and ready to go, in the freezer. I had the foresight to purchase five pounds of pork fat back and freeze it in one pound packs. The day we made plans, I grabbed the pork and put it in the fridge, along with the fat. That night, I ground them, still crunchy with frost, with my old hand grinder that I swore I wouldn't use again. It wasn't as bad as the first time (maybe because I had a hungry family to feed the first time, and this was at night, alone). One of the great things I learned about this challenge was that I do indeed want a dedicated sausage grinder. Maybe I even need one. Did you know that you can also use your grinder as a food mill? As long as you are scrupulously clean, applesauce and tomato sauce can also be processed in a meat grinder. I have not done this personally, but do intend to try.

On that night, returning from the sausage stuffing event, it was hot as blazes out and what better meal to have then the sausages I traded with Peter and Winnie. I think I got the better end of the deal. Winnie made merguez, which reminded me of a place I used to eat at in Brooklyn called Oznot's Dish, where I used to get the outrageously good merguez with eggs. Winnie's merguez took me right back. And Peter's Spanish Chorizo, whoah. Perfectly subtle and outrageous at the same time. I had the sausages with a small, barely dressed salad, and it made for such a exquisite meal. Even though it was thrown together. Even though I was sitting at the kitchen table with bare feet, and a toddler across from me was eating plain noodles with his hands.

My Italians.
As with anything you make or grow yourself, these sausages were transcendent. Really and truly they were something I chewed and sort of felt completely in the moment about. Or was I transported? I never know, in those moments, what it exactly is, but you get the idea. Is it better because it's better, or because you did it yourself? Both, I guess. I really wasn't expecting much from my sausages--sweet Italian, whatever, right? And I did love them. But upon further thought and research I wondered about my sausages. They didn't have the fat distinct from the meat, as they should have. Did the meat "break" I wonder? Apparently that would have rendered the sausage unpalatable. But I thought they were delicious, amazing, but maybe a bit too rich. This is also a sign of a not quite fully realized sausage. No matter. This is a mystery I intend to solve. I will continue this delicious research diligently. Thanks again, Charcutepalooza!

Do you know how hard it is to take a picture, when there is a hungry person behind you?

Sunday, June 12, 2011

The Hip Girl's Guide To Homemaking - Giveaway!


It's a very photogenic book.
This book giveaway is now closed! The winner will be posted in a few days!

I don't do a lot of giveaways over here, as you might have noticed. Only when there's something really worthwhile. And The Hip Girl's Guide to Homemaking: Decorating, Dining and the Gratifying Pleasures of Self-Sufficiency--on a Budget! by Kate Payne is totally worthwhile.

I am a bit skeptical when it comes to books that claim to cover a lot of ground. So, when I cracked the lovely spine of this book, it was with a bit of my personal brand of Okay, show me what you got. (It's not my best characteristic, I'll have you know.) This is the kind of book that you can jump in the middle of, get wrapped up, and feel very satisfied. I love "sticky" books like that, meaning books that keep me reading. I wanted to wait to read the whole thing through to review this, but I kept getting sucked into certain chapters. For a light and charming read, it's a very dense book that's full of return. How does Kate Payne do it?

Being a homemaker myself, and in my opinion, a fairly accomplished one (that's where that voice comes from!), I found myself learning tons of things. It was mostly about things that I never pursued because I didn't find them that interesting. Like cleaning, for example. But Kate not only brings things together clearly and easily for you, but she makes it fun to read, and suddenly you think: totally! I am going to go turn the water off on my toilet so I can really give it a thorough cleaning!! (I actually thought this, but haven't done it yet. Step-by-step in the book!) I have, however, already cleaned my drains out with a goodly dose of vinegar and baking soda. A simple idea, one I've read in other places, but these little factoids drift in your head while more enticing things sit front and center. Hip Girl's Guide to Homemaking actually made me want to do them!


I started with the introduction, which is thoughtful and smart and where you'll find that this book was a journey for Payne. You can see that in the research that she has done. She quotes from philosophical treatises on keeping a home, and eating well, to the basic bibles that we all grab for. This is not only a book with elbow grease, but a book with an artful brain. At the end of each chapter, there is a list of resources, both books and websites, that can deepen your quest for homey knowledge. But her knowledge is not just a rearrangement of other informations, it was her quest to find the best way to live, while doing so frugally. This book isn't looking to tell you to go out and buy this and buy that to make your life easier. Anybody can organize a house with a bunch of money. But it takes some ingenuity and creativity to make it work on a tight budget. I think everyone can relate with that.

There is so much in Hip Girl's Guide to Homemaking, that it would be too much to list. But in a nutshell, the book covers the home, room-by-room, and all the things you need to know about to make your life worth living in that home. Like gardening, and basic DIY projects, cleaning, taking care of your linens, basic tool kit needs, cleaning, and of course, my personal faves, cooking, canning and entertaining.

If you were at all wondering if it is indeed "hip," you can rest assured that it is, in the very best way possible. One of the things I like best about The Hip Girl's Guide to Homemaking, is that it is totally green and eco-friendly without getting up on a soapbox. Everything is explained, in a not-condescending manner, that is: clearly, but with the awareness that you, the reader, also have a brain. Isn't that nice?

Okay, so you want this book, okay? If not for you, than someone in your life. I've already given it as a graduation present, which I highly recommend, but as I pointed out, this forty-one-year-old still found it very pertinent. Here's the giveaway deets:

Leave a comment here. Tell me what "impressive acts of domesticity"you want to learn more about! You MUST leave an email address in your comment if you don't have a blog that you are linking to. If you win and there is no way to contact you, I will re-draw. Blogger's comment format stinks, and I apologize for that, so if you have problems, please e-mail your comment to halfpintpreserves[at]gmail[dot]com, and I will accept that as an entry. You have until Sunday, June 19 at midnight EST to enter.


First prize: A copy of Hip Girl's Guide to Homemaking by Kate Payne


*Prize Update*  Kate has graciously announced that the first prize winner will also receive a jar of her preserves from her own cupboard, sent personally from her!


Second prize: a sweet little jar of jam from yours truly


Please check out Kate's blog, The Hip Girl's Guide to Homemaking Or visit her Facebook page where you can see what new things she's up to, most recently a beautiful watermelon jelly she made. And if you are on the West coast, check out her tour, with stops in Portland, San Francisco, Santa Cruz and Seattle in the next few days. There's some great events, like cocktails with Kate, hosted by Meg from Grow and Resist!

This could be your mailbox!

Tuesday, June 7, 2011

Smoked Bluefish and Mackerel


A few weeks back, I took a little trip to the south shore of Long Island. Aside from seeing family, I had an ulterior motive: to bring back a large quantity of fish to smoke. It had been a while since I smoked some trout, and I wanted more. By that I mean quantity. I had two ideas: mackerel and bluefish. I don't really love either one except for when they are smoked or pickled. Walking into the fish store I like, the first sign I saw was for Long Island bluefish, right off the boat, for $1.99 a pound. Score! It was that cheap, of course, because no one really likes bluefish. The mackerel was from the Atlantic, off the shores of Boston. I bought about ten pounds in all, and had them butterflied, with the skin left on. Back home I had to jump right into production. With oilier fishes, you don't want them to sit very long at all. Ideally, you want to catch them yourself and get them going as soon as you dock. Being quite the landlubber, except for the eating of fish, I am not yet at that stage.


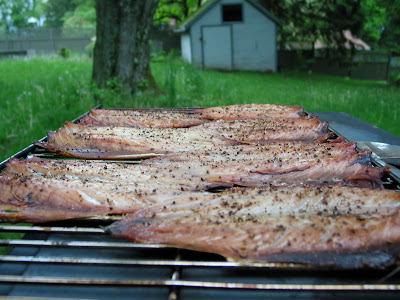
I brined them in different brines. Let them rest and dry, to form that good old pellicle, and smoked them at 190 degrees until they were done, which was about two hours. The bluefish, being bigger and thicker, took a tad longer. After they cooled they were wrapped up and put in the freezer for consumption over the year. Smoking fish does not preserve the fish. It must be refrigerated for up to a week, or frozen for up to six months. It freezes, I have learned, beautifully. Now I will always be prepared for guests, and the occasional bagel, that comes my way.


Bluefish:

5 to 7 pounds of butterflied fish, skin on, heads removed

For the brine:

2 quarts of water
3/4 cup kosher salt
3/4 cup sugar
1 tablespoon of molasses
2 bay leaves
1 teaspoon of fennel
lemon and orange peels (I used a whole lemon and orange)
1 teaspoon of peppercorns
pinch o' red pepper

Dissolve the salt and sugar in the brine. If you use hot water, let it cool, preferably overnight before adding the fish. Brine the fish for three hours. Let it dry on a rack for a few hours until the pellicle forms, the fish is sticky or tacky to the touch. Hot smoke at 190 degrees from 2 to 4 hours.

Mackerel - follow the same directions using this brine:

2 quarts of water
3/4 cup of salt
3/4 cup of sugar
2 bay leaves
4 grapefruit peels
1 teaspoon of pepper
pinch of red pepper

Heavily coat the mackerel with cracked black pepper after the brine, before the drying.